

Configure your domain’s CNAME to target either a
GVC endpoint or a Workload endpoint.A GVC endpoint routes traffic across all domains mapped to the same GVC and is useful when a single CDN route is configured for many domains or wildcard subdomains. Geo-routing still applies, but traffic will be sent to all locations even if a specific workload in one location is unavailable.A workload endpoint routes traffic to a specific workload within a GVC and provides more precise geo-routing and failover for that workload.
If a workload in one location is down, traffic will fail over to other locations for just that workload.Cloudflare Configuration Steps
Prerequisites
- Review the Configure a Domain guide.
- An account at Cloudflare.
- Your domain’s DNS is hosted at Cloudflare.
- Your workload is configured and in a
Readystate.
Step One - Domain Set Up and Certificate Generation at Cloudflare
From the Cloudflare UI, perform the following:Domain Set Up
- From the DNS management page for your domain, click
DNS Recordsin the top right and add a newCNAMErecord.- For the
Namefield, enter the desired target subdomain. - For the
Targetfield, enter theCanonical EndpointURL from the workload Info page. - Toggle on the
Proxiedswitch.
- For the
Certificate Generation Set Up
- From the SSL/TLS page, select the
Full (strict)radio box. - Click on the
Origin Serversubmenu link.- Create a new origin certificate for your domain with the following settings. This certificate will be added as a TLS Secret at Control Plane.
- Select
Generate private key and CSR with Cloudflare. - Select the private key type:
RSA (2048). - The default list of hostnames shouldn’t have to be changed and will contain the
*.DOMAINandDOMAINhostnames. - Choose a long Certificate Validity such as 15 years.
- NOTE: It is your responsibility to ensure the certificate mapped to your domain at Control Plane is valid.
- Click
Create. The next page will display the certificate and private key. You may save these as separate text files or leave the page open and copy/paste the values when creating the TLS Secret at Control Plane in Step Two.
- Select
- Create a new origin certificate for your domain with the following settings. This certificate will be added as a TLS Secret at Control Plane.
Step Two - Certificate Set Up at Control Plane
- Using the certificate and private key generated in Step One - Certificate Generation Set Up, create a new TLS Secret at Control Plane by performing the following:
- Click
Secretsfrom the left side menu. - Click the
Newbutton at the top. - Enter a
Namefor the secret and select the secret typeTLS. - Click
Datain the left pane. Either upload or paste the respective certificate and private key file in the proper textbox. The TLS Chain can be left empty since this certificate is self-signed. - Click
Create. This secret will be used when configuring your domain in the next step.
- Click
Step Three - Domain Set Up at Control Plane
Follow the steps below to configure your domain at Control Plane. Note: If a subdomain is being configured, the APEX domain will need to be verified.- Click
Domainsfrom the left side menu. - Click the
Newbutton at the top. - Click
Advancedin the left pane. Enter theFully Qualified Domain Name (FQDN)of your domain. You will need to prove ownership of the domain before continuing. - Select
CNAMEfor theDNS Mode. - Select and configure the desired
Routing Mode. - Click the
Add +tab, and toggleUse Custom Server Certificate. Set theServer Certificate Authority PEMto the TLS Secret created in the previous step, then clickCreate.
After completing Steps One through Three, it will take a few minutes for the updates to propagate throughout the Internet.Once fully configured, your workload will be accessible via the CDN using the subdomain configured in Step One - Domain Set Up.
Amazon CloudFront Configuration Steps
Prerequisites
- An AWS account.
- Access to edit DNS settings for your domain.
- Your workload is configured and in a
Readystate.
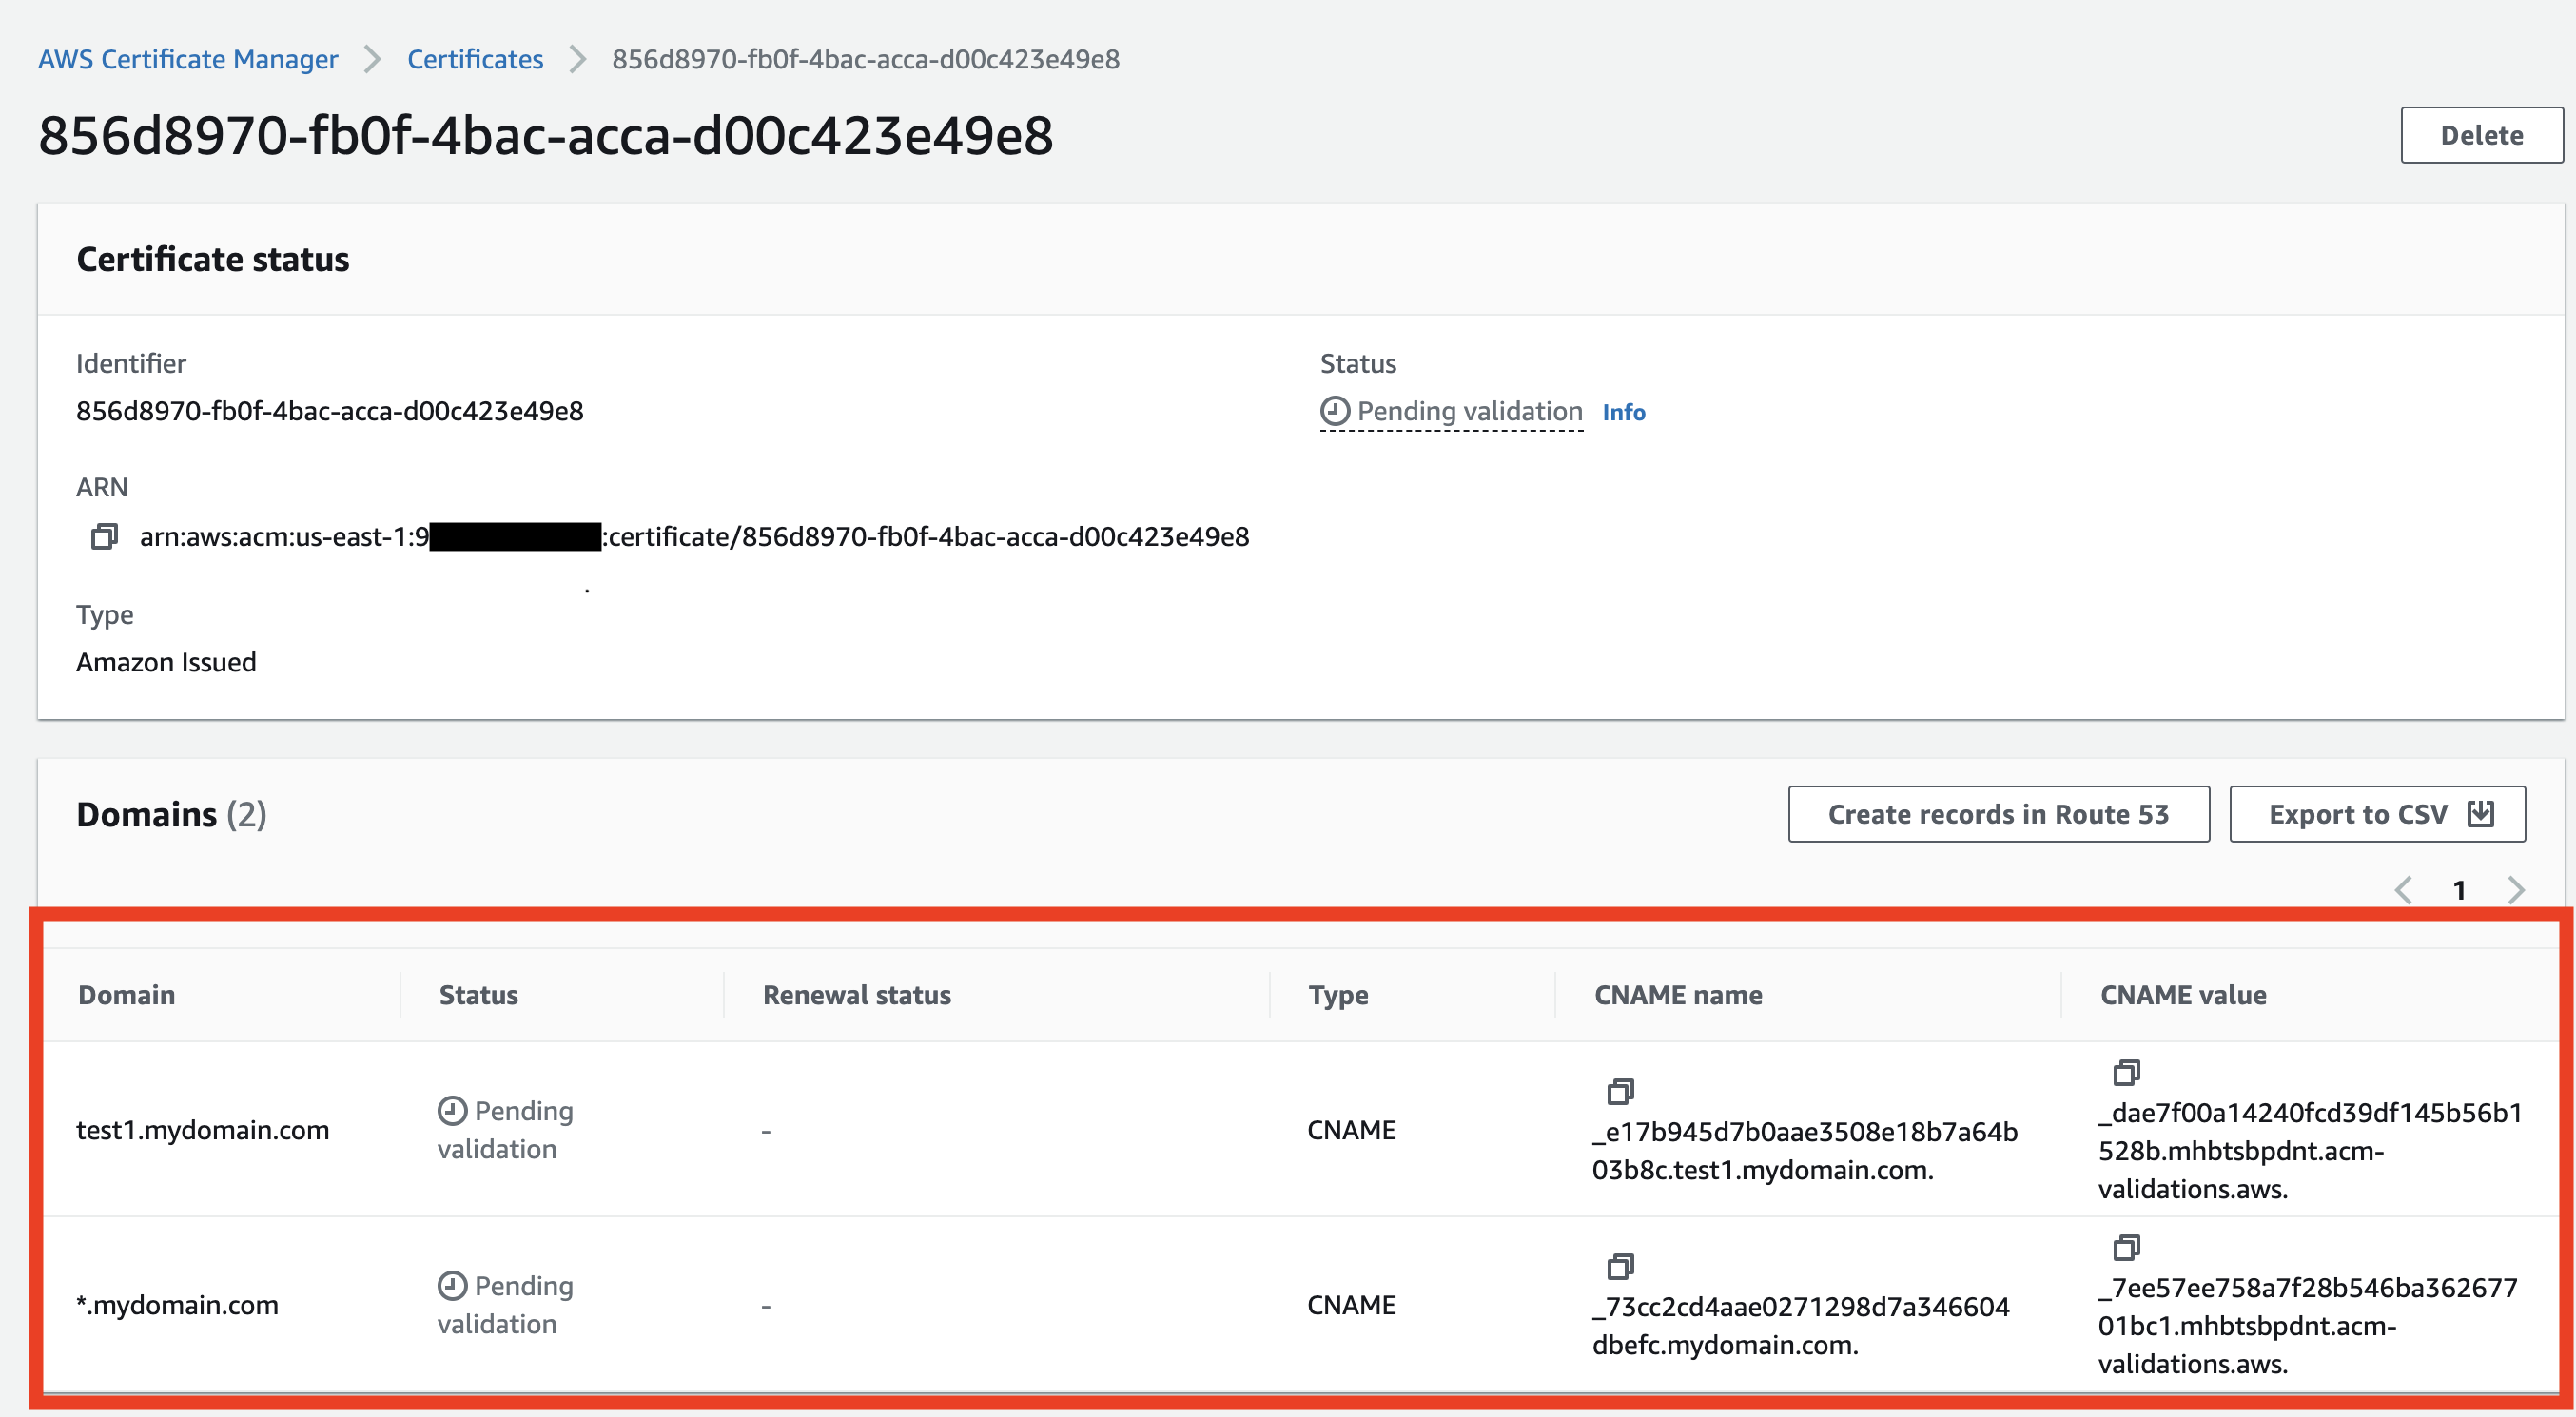
Step One - Request a public certificate
Request a public certificate with AWS Certificate Manager (ACM) inN. Virginia region using the settings below.
- A public TLS certificate is required for your domain. Use the following settings:
- Domain Names:
subdomain.mydomain.comor*.mydomain.com - Validation Method:
DNS Validation - Key Algorithm:
RSA 2048
- Domain Names:
The certificate must be in the US East (N. Virginia) Region (us-east-1).
- Access the newly created certificate on the ACM. Validate the certificate by creating the records in your DNS service as described.
Step Two - Create CloudFront distribution
-
Go to CloudFront distributions page and click on
Create Distribution. -
Configure the
Origin Domainto the public endpoint of your workload. Use one of the following methods, depending on whether you are using a BYOK location or a managed location (standard):-
For managed locations (standard) only:
Use the
Canonical EndpointURL from the Workload Info page asOrigin Domain, formatted as follows:cloudfront-httpbin-0ac6x9wrgpj00.cpln.app.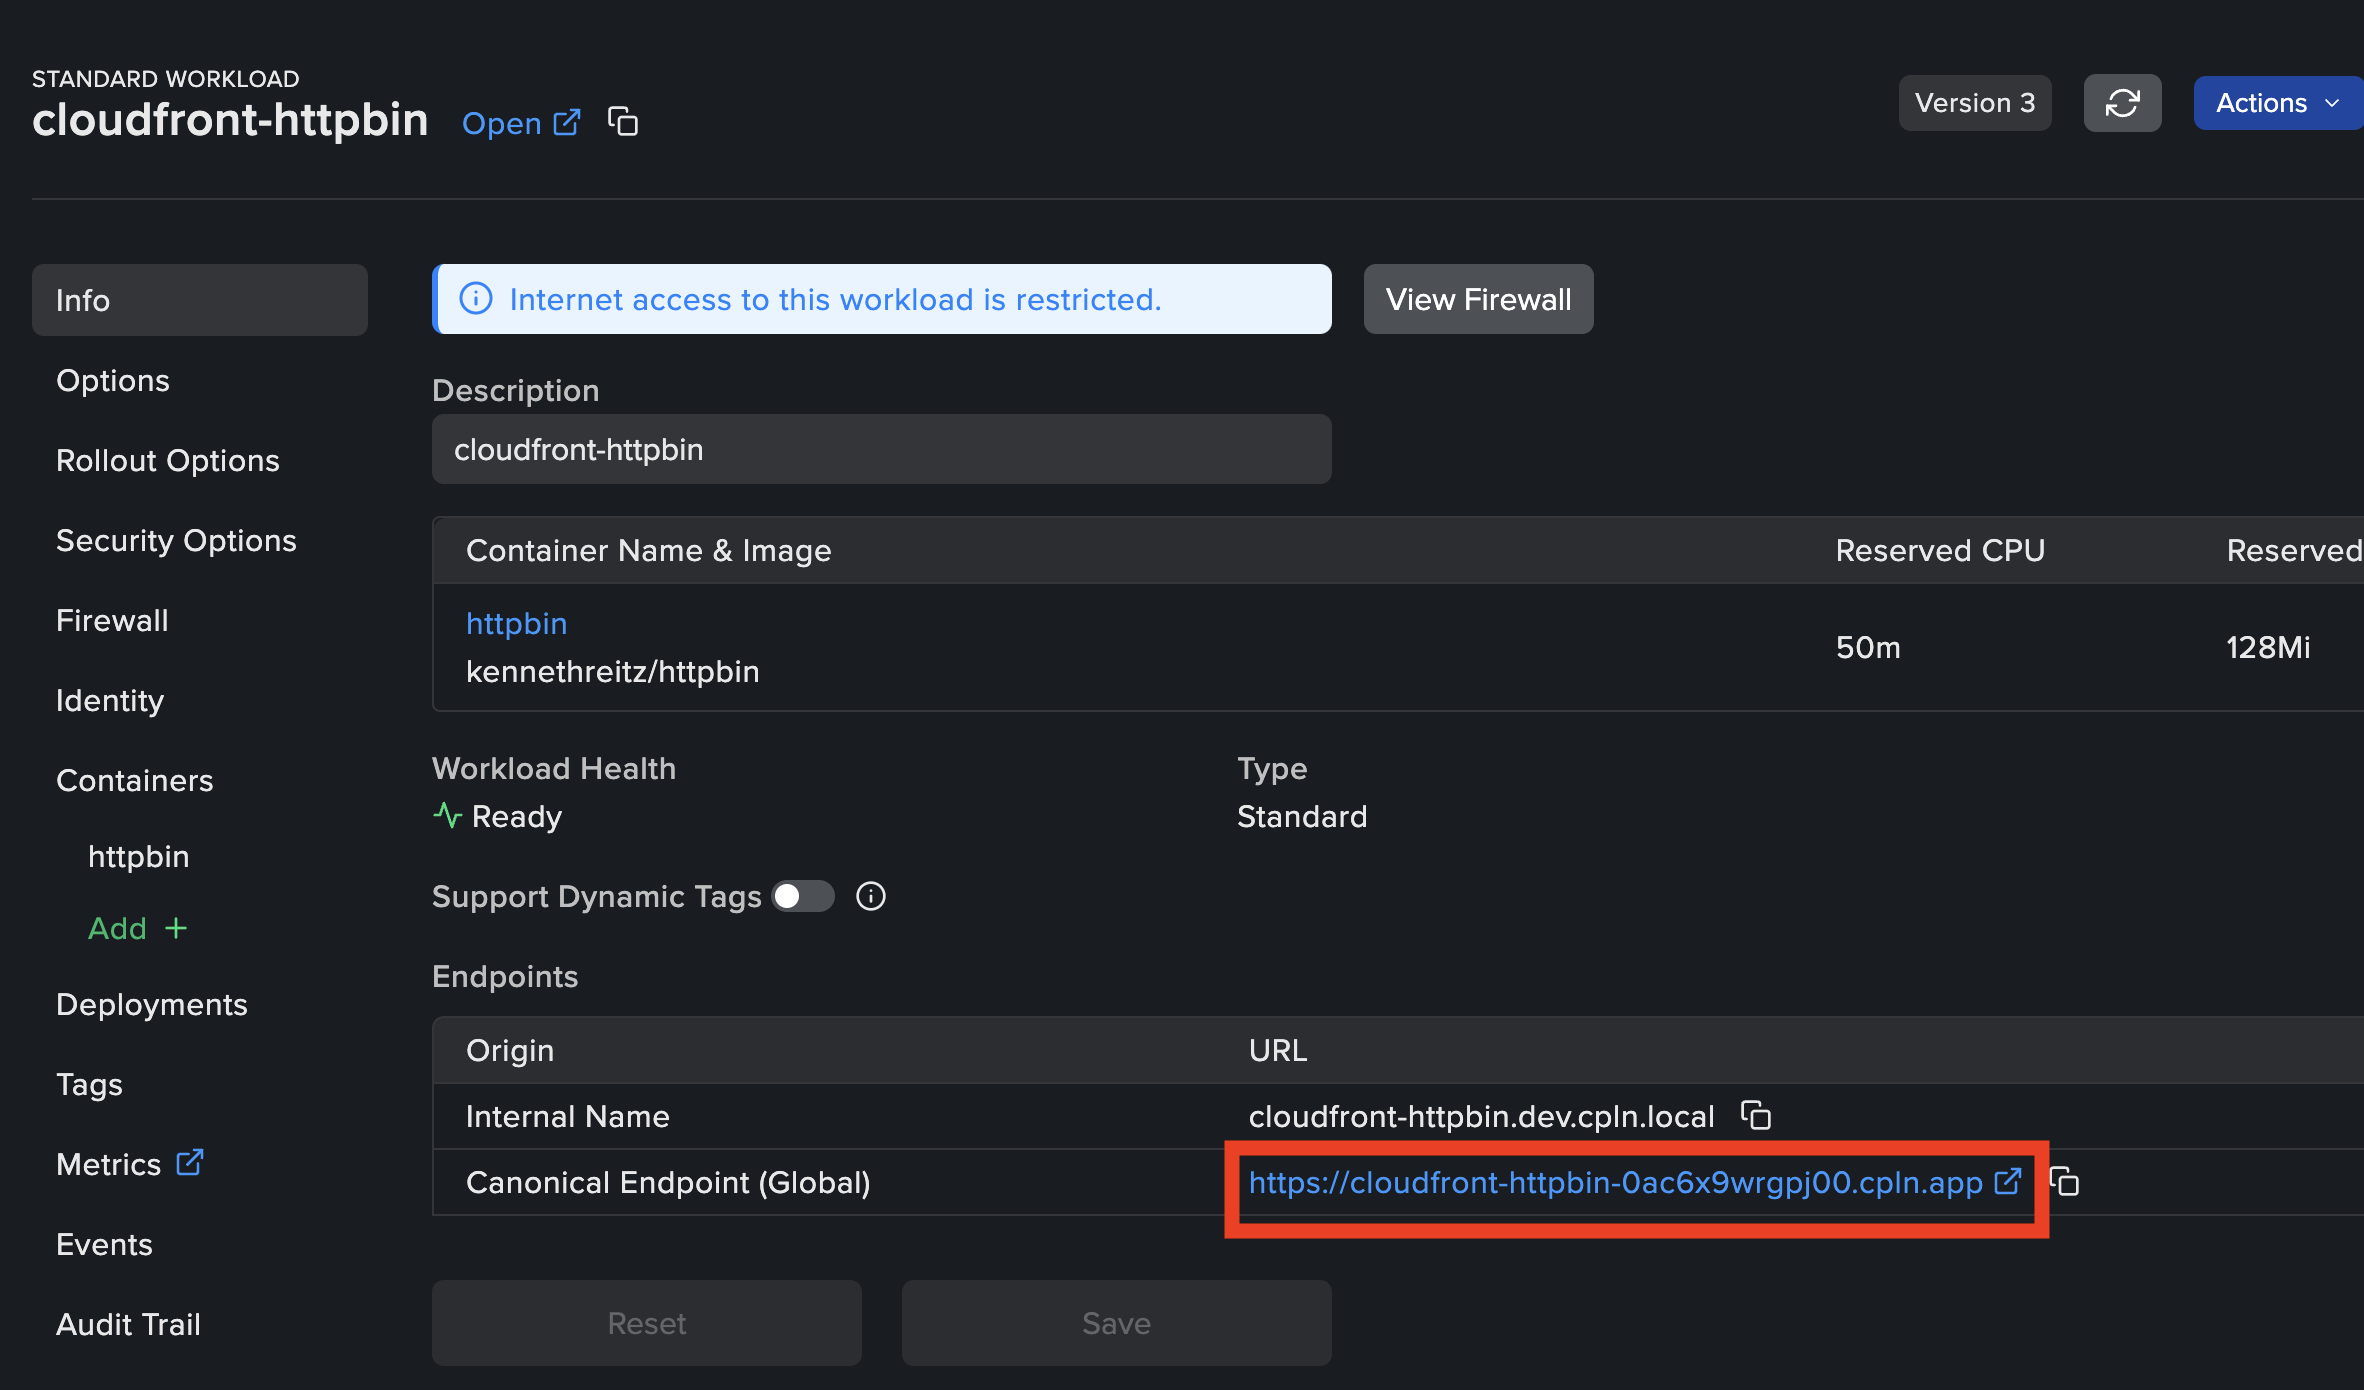
-
For BYOK locations only:
Locate the public endpoint on your Workload Deployments page. Use this address as the
Origin Domainvalue in CloudFront, formatted as follows:nginx3-7mhf5d3qcsrqt.eksctl-byok-aws-west2.controlplane.us.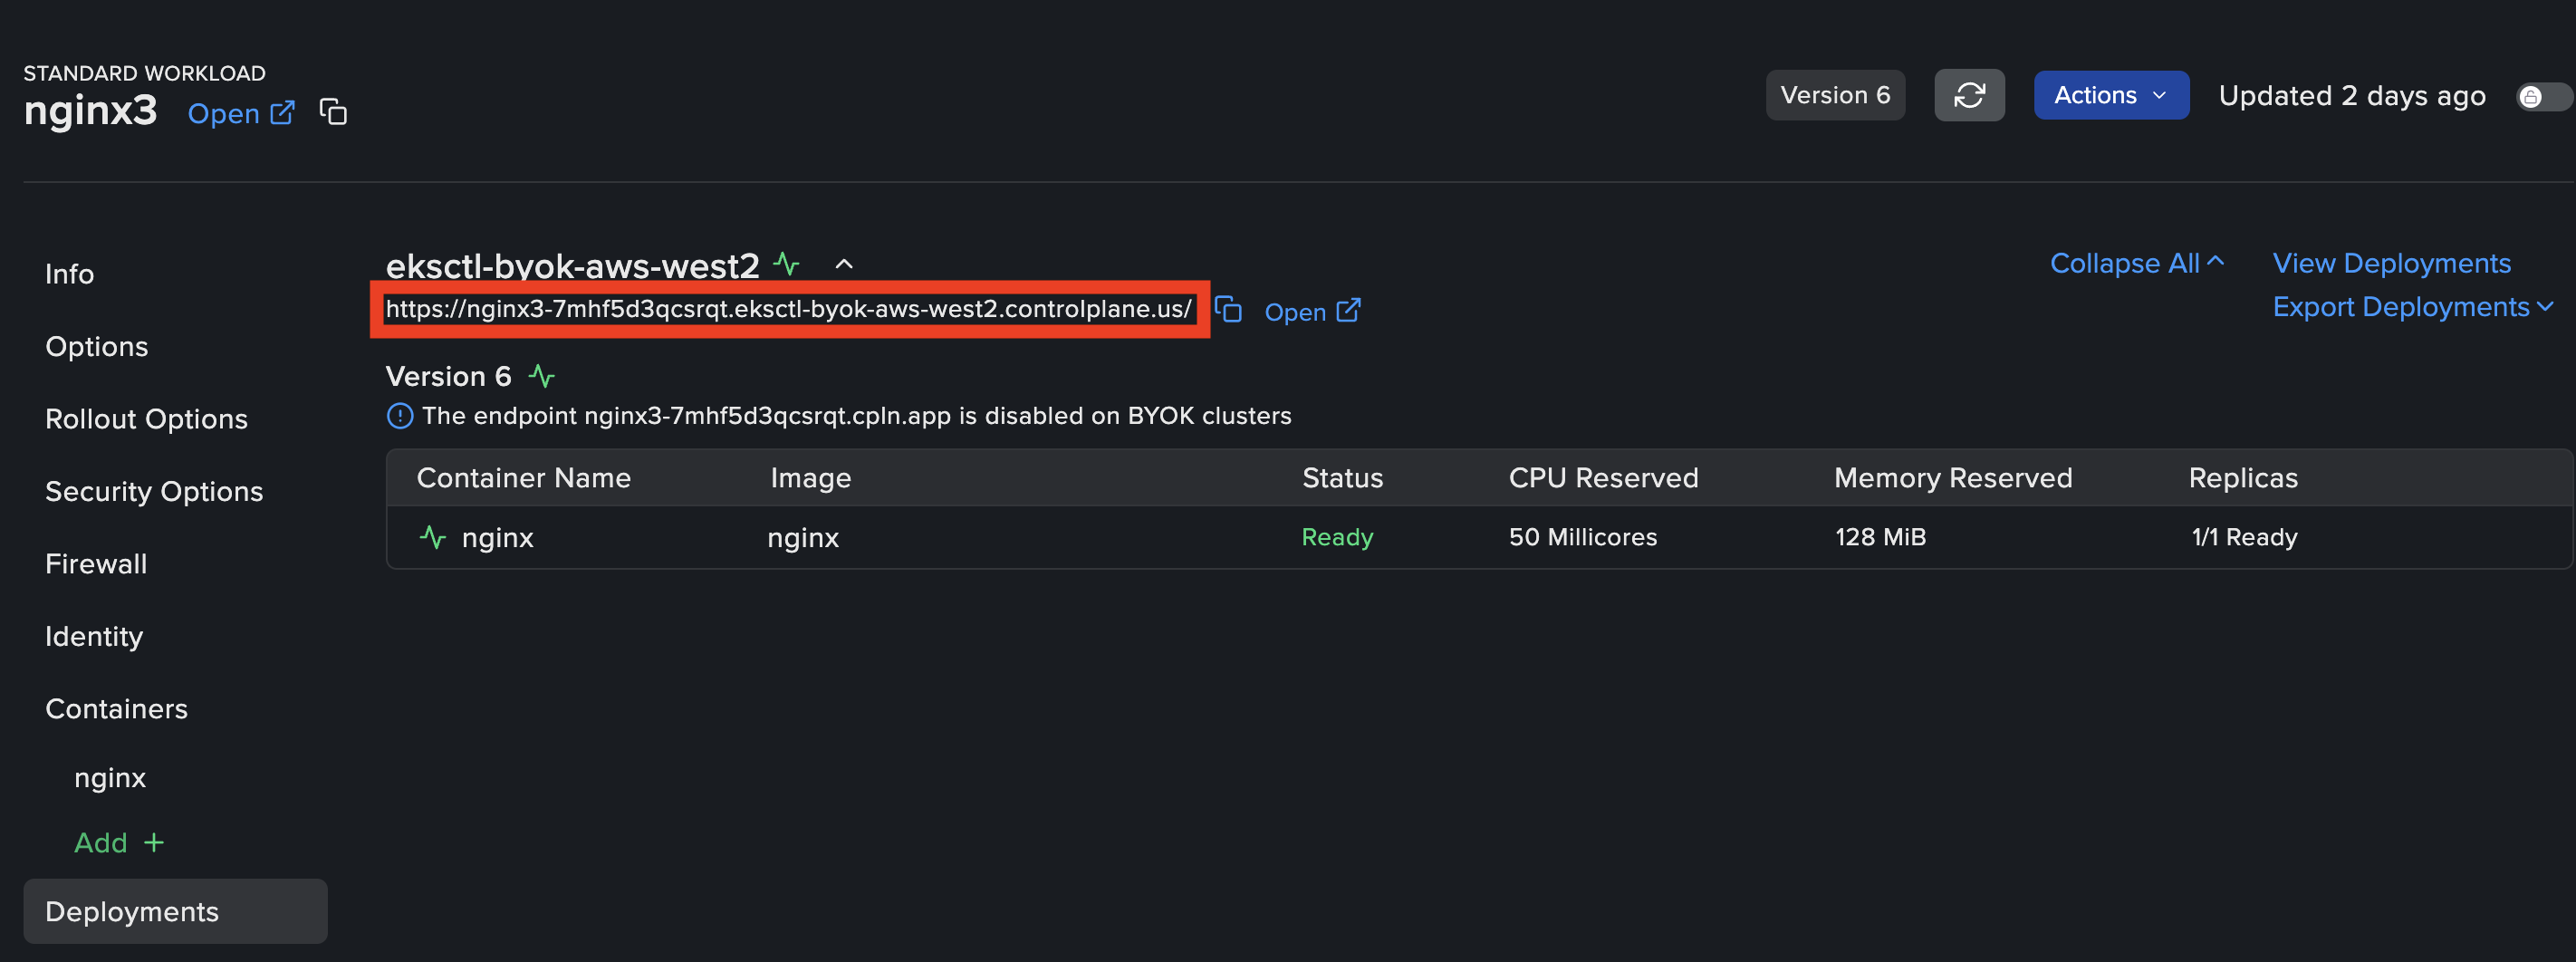
-
For managed locations (standard) only:
Use the
-
Edit the
Alternate domain namefor your domain. In the format:subdomain.mydomain.com.
Then select theCustom SSL certificatecreated in Step One - Request a public certificate from the list.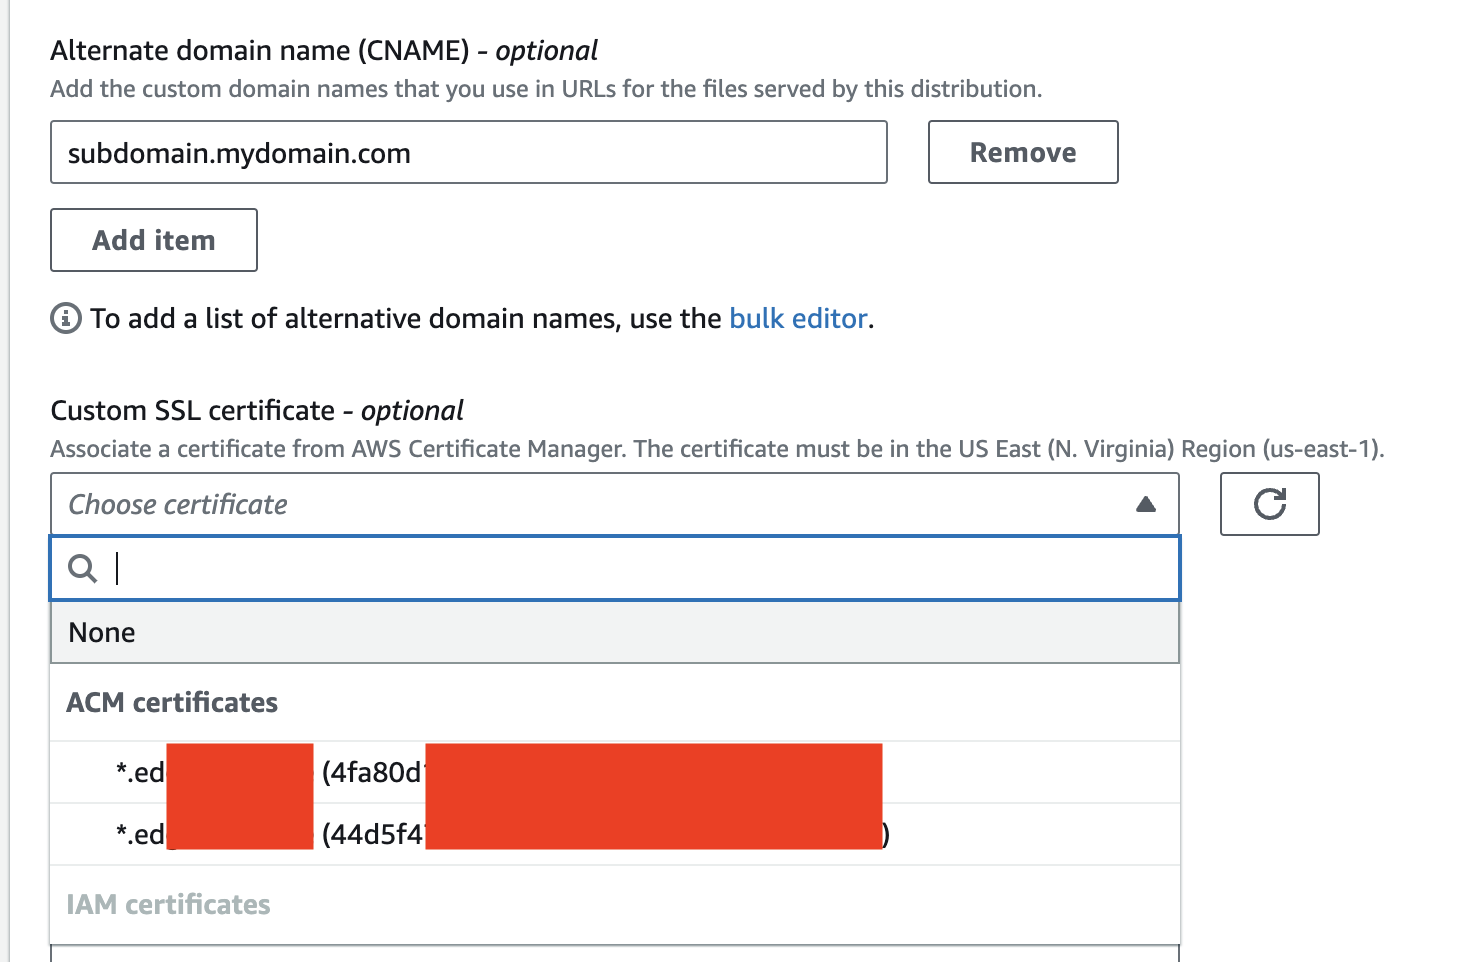
-
You must select
Cache policyand complete the rest of the configuration as needed. -
Click on
Create distributionand wait for a few minutes for the changes to apply.

Step Three - Configure DNS
Create a CNAME record in your DNS service (such as Route53) that will match the Alternate domain name in the CloudFront distribution created in Step Two - Create CloudFront distribution: Use values that match your CloudFront distribution. For example:- Type: CNAME
- Name:
your-subdomain - Data:
your-distribution.cloudfront.net
Step Four - Configure firewall rules to restrict access via CloudFront
- To prevent direct access to the workload endpoint, configure the firewall settings for the workload to allow ingress for CloudFront list of IP ranges. You can refer to this example workload YAML file and copy the CIDR range directly from this manifest.
-
BYOK Only: If you have created inbound rules on the Security Group of the Load Balancers, either directly or using the Actuator configuration INGRESS_FIREWALL_CIDR_LIST, you will need to update the Security Group configuration with CloudFront CIDR ranges to enable CloudFront access to the workloads. Important: To support this setting, ensure that your quota for
Inbound or outbound rules per security groupunderAmazon Virtual Private Cloud (Amazon VPC)values for at least 530 rules. Visit Service Quotas in the AWS console for your region to request a quota increase if necessary.